Borodinsky Sourdough Bread
Rye-wheat · pan · scalded
Borodinsky scalded rye on rye sourdough, red malt, coriander, caraway, and mandatory crumb maturation.
Live timing needs JavaScript enabled.
Calculated for the current time; the worksheet lets you set any start.
Recipe
Current recipe
For baking now: the final working formula, ingredients, steps, and baking worksheet.
Taste & texture
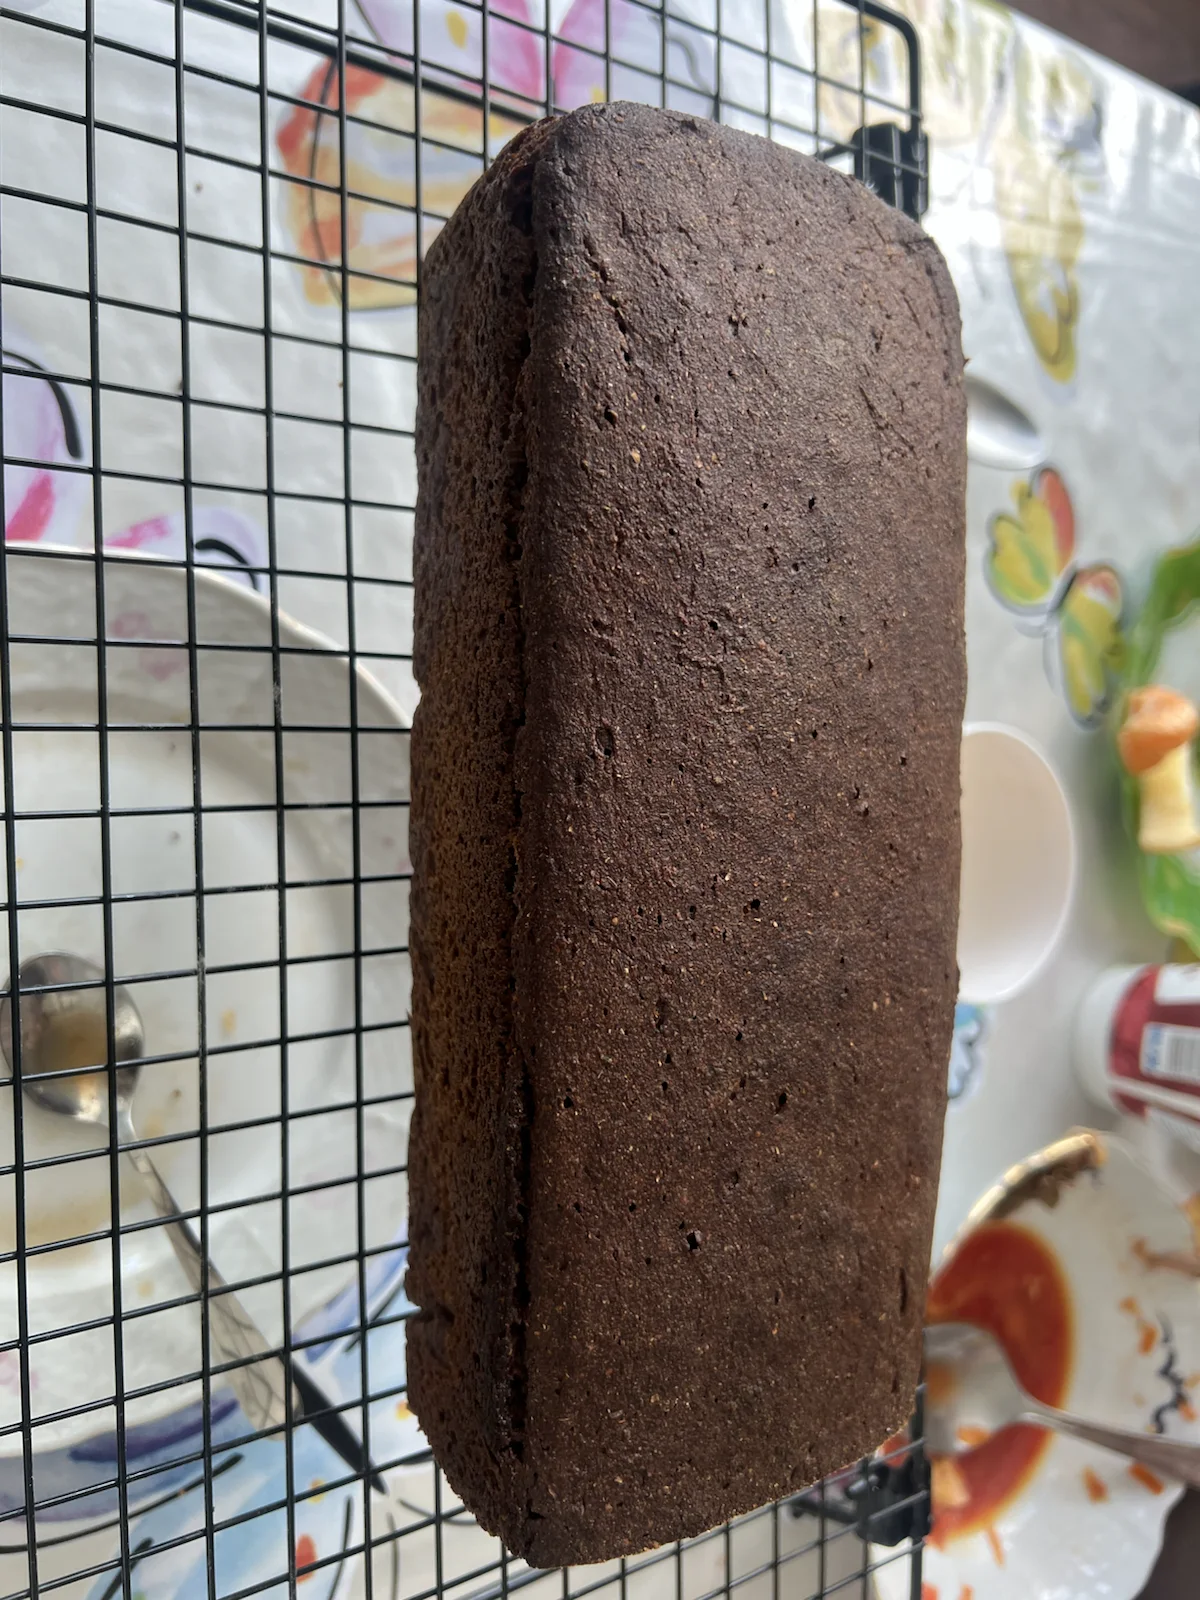
The crumb is tight, dense, and moist — close-grained like cake but with a satisfying chew; after 36-48 h it firms up cleanly and the knife leaves no residue. The crust is firm and mahogany-dark. Flavour opens with malty-chocolate sweetness from the red malt and molasses, then the sourdough lactic tang pulls it back into balance. Coriander registers as a bright citrusy-peppery note; caraway adds a quieter, slightly fruity bite underneath. The loaf keeps well for several days, staying moist as the scald continues to bind water.
As described by: The Rye Baker — Auerman Borodinsky , Beets and Bones — Russian Sourdough Borodinsky Bread , Flavor365 — Borodinsky Bread: Everything You Need to Know
Baking worksheet
Good to know
Why not change sweetness now?
The previous tasting was mixed with wet-crumb and plastic-storage effects. First repeat with normal storage, then change sugar or molasses separately.
Can I skip white malt?
Yes, but the scald will be less sweet and less saccharified. Record it as a deviation.
Why not leave the scald on the counter overnight after 65 °C?
After saccharification it is wet, sweet, and close to neutral; refrigeration lowers the risk of ropy crumb defects.
Borodinsky is not a simple rye loaf: it is a controlled scalded-rye system built from rye sourdough, a 65 °C scald, red and white malt, coriander, caraway, sugar/molasses, stepped baking, and crumb maturation. The scald is what sets it apart from ordinary sour rye — it is a deliberately enzymatic, sweet, dark component that has to be built before the dough is even mixed.
How Borodinsky Is Baked Around the World and Why
Borodinsky is a Russian and post-Soviet classic, codified in the Soviet standard GOST 5309-50 and tied by legend to the Moscow region (the Borodino battlefield), but the same logic — scalded dark rye, sweetened, scented with coriander — repeats across the rye-belt of northern and eastern Europe, just with different accents.
In Russia and Belarus the loaf is baked in a tin to a glossy near-black top, sweetened with molasses or sugar, and finished with whole coriander pressed onto the crust; coriander is the signature note that makes it read instantly as “Borodinsky” rather than generic black bread. In the Baltics — Latvia’s rupjmaize, Lithuania’s juoda duona — the same scalded-rye base leans sweeter and sourer at once, often using caraway instead of coriander and sometimes hearth-baked rather than panned. German Vollkornbrot and pumpernickel share the scald-and-long-bake DNA but drop the spice and push the bake far longer and lower, so colour comes from hours of heat and Maillard/caramelization rather than from added malt. Finnish and Estonian dark ryes sit in between, often more sour, sometimes with a touch of malt syrup.
Why this shape recurs is enzymatic, not stylistic. Rye starch gelatinizes at a low temperature and rye is rich in amylase, so an unmanaged rye dough turns to gum. A scald (Brühstück) pre-gelatinizes part of the flour and lets a controlled, time-limited saccharification happen on purpose, at 65 °C, where the white malt and the flour’s own enzymes convert starch to sugars before the bake — feeding flavour and crust colour while binding water so the dense crumb stays moist for days. Sourdough acidity is the brake: it tightens the rye pentosans, slows runaway enzyme activity, and keeps the high-hydration paste structured enough to rise in a tin. Pan baking and a long stepped descent (hot start, then progressively cooler) set the crust and drive heat to the centre of a loaf that conducts poorly. The 24–48 h rest is not optional polish — in scalded rye it is when moisture redistributes and the crumb stops being sticky.
Theory
Borodinsky carries many variables at once: rye sourdough, scald, malt, sugar/molasses, coriander, caraway, high hydration, pan baking, storage, and crumb rest. They are easiest to read when they are not all changed together. The controls that decide the loaf are starter maturity, a clean 65 °C scald, proof height, internal temperature, storage method, and the crumb judged at 24–48 h. Because the dough is a high-hydration paste with almost no gluten, structure comes from pentosans and acidity rather than kneading, and the loaf is steered by timing and temperature far more than by mixing.
How the Borodinsky System Works
Borodinsky is not just “rye bread plus coriander.” Its flavour comes from a controlled balance:
| Element | Job | | --- | --- | | Rye sourdough | Acidity, gas, enzyme control, fermented rye aroma | | Malt scald | Dark colour, sweetness, malt aroma, water binding | | Sugar/molasses | Sweetness, colour, moisture, and roundness against acidity | | Coriander/caraway | Style-defining aroma; too much quickly dominates | | Pan proof | Volume and structure in paste-like dough | | Crumb rest | Moisture redistribution and cleaner slicing |
If the bread is bland, sticky, sour, or dense, changing everything at once tells you nothing. Adjust one variable only after storage and rested crumb are recorded.
Sourdough and Scald Have Different Jobs
Sourdough is the acid and fermentation engine. The scald is a flavour and water-binding component. A good scald cannot rescue exhausted sourdough, and strong sourdough cannot fully replace malt scald character.
The scald should be uniform, dark, and hydrated without dry pockets. The current working process is 3 h at 65 °C, then cooling and refrigeration. Do not leave the sweet wet scald overnight on the counter in this control version. The useful record is time, temperature, smell, and texture before mixing.
Proofing and Ceramic/Pan Risk
Pan rye is ready by height and surface state, not by the timer alone. Underproofing gives a heavy compact crumb. Overproofing gives collapse, strong sourness, large ruptures, or a weakened top.
Cold ceramic or a heavy pan can delay centre heating. That means a loaf can look dark outside while the crumb still needs time. Internal temperature and rested crumb matter more than colour.
Storage and Maturation
Borodinsky should not be judged from a hot slice. For the first day, avoid sealing a warm loaf tightly in plastic because trapped steam can turn the crust and surface crumb wet. A 24–48 h rest gives a cleaner read on moisture, acidity, sweetness, malt, coriander, caraway, and salt.
If Something Goes Wrong
- Bland but well risen → check salt, malt, coriander, or sourdough maturity.
- Sharp sourness → starter timing, inoculation, or bulk length.
- Sticky knife after 24 h → bake, internal temperature, storage, or too much water.
- Dry crumb → bake length, storage, or the bound-water components (scald, molasses).
- Good crumb but weak aroma → scald time, malt quality, coriander freshness.
Theory Sources
- GOST 5309-50 reconstruction (Borodinsky) — breakdown of the recipe and profile of the Borodinsky style per the standard (80% wholemeal rye / 15% type-II wheat / 5% red malt).
- Sourdough Bread Quality: Facts and Factors — review of sourdough, acidity, and bread quality.
- Arabinoxylans as Functional Food Ingredients: A Review — review of water binding relevant to rye crumb.
- Chemistry of bread aroma: A review — review of fermentation and baking effects on bread aroma.
Home Adaptation
Borodinsky can be managed at home as a controlled pan bread. The professional topics — scald, acidity, malt, spice, moisture, and storage — become simple records: scald time and condition, starter readiness, proof height, internal temperature, storage method, and crumb after rest.
The home risk is changing everything at once: water, sugar/molasses, malt, spice, and bake profile. Change only one parameter after a clean storage check and a crumb check at 24–48 h.
Ingredients
Change any amount — the rest rescale by the bread’s formula.
| Component | Grams | Baker's % |
|---|---|---|
| Sauerteig preferment | g | 31.85% |
| Brühstück scald | g | 89.17% |
| Whole-grain rye flour in final dough | g | 50.05% |
| First-grade wheat flour | g | 13.65% |
| Water in final dough | g | 18.2% |
| Salt | g | 1.82% |
| Sugar | g | 6.92% |
| Molasses or honey | g | 4.55% |
Preferments, scalds, and old dough are shown as prepared components; their composition is listed in the row details and worksheet.
Ingredient details
Sauerteig preferment
- Composition
- 25 g active rye starter + 75 g whole-grain rye flour + 75 g water
- Schedule
- 4 h at room temperature until risen and clean lactic-sour, then about 19–20 h in the refrigerator until the Friday-morning warm-up
Brühstück scald
- Composition
- 112 g rye flour, 28 g red rye malt, 12 g white malt, 8 g coriander, 5 g caraway, 325 g boiling water
- Schedule
- 3 h at 65 °C, cool 30–40 min, then refrigerate overnight
First-grade wheat flour
- Brand the author uses
- MukaMuka first-grade wheat
- Alternatives
- Limak first-grade, Predportovaya first-grade
Water in final dough
- Range
- 80–120 g by consistency; target texture is a thick paste, not stiff dough
- Brand the author uses
- Tap water through Barrier Iron x2 filter
- Alternatives
- any filtered or bottled drinking water
Salt
- Brand the author uses
- Pink Himalayan salt
- Alternatives
- sea or table salt (avoid iodized)
Sugar
- Brand the author uses
- White sugar, no specific brand
- Alternatives
- any white sugar; for brown — Mistral demerara
Conditions and equipment
Conditions
- Level
- advanced rye; a 60/40 rye-wheat loaf is an easier starting point
- Kitchen temperature
- about 22–24 °C; record the actual temperature
- Doneness temperature
- 98–99 °C internal; probe required
- Main risk
- confusing technological crumb moisture with the storage effect of sealing the loaf in plastic
Equipment
- Pan
- Emile Henry Petit Moule Cake 1.1 L
- Oven
- Haier HOQ-F6QS, top-bottom heat, hand steam/steam generator, 1 upper stone during preheat
- Mixing
- Kenwood KVC85.004SI, K-beater on Min; hook not used
- Control
- probe thermometer, scale, dough-height notes
Nutrition: Borodinsky bread
Bread nutrition facts
Per 100 g of bread
192 kcal
protein 5.1 g · fat 1.1 g · carbs 40.3 g
Per slice (50 g)
96 kcal
protein 2.6 g · fat 0.6 g · carbs 20.2 g
Automatic calculation from USDA + Skurikhin database for the baked loaf after evaporation. Numbers are approximate: 1) the database covers ingredients, not finished dough; 2) bake water loss is assumed at 10% — actual loss depends on crust, time, and pan. Add 5–10% in calorie trackers if needed.
Borodinsky is a dense rye sourdough with malt, coriander, and honey. It is flavourful and filling, but because of the sweet-sour profile and density it is best eaten in thin slices.
- Digestion
- Rye sourdough and dense crumb usually give longer satiety than white bread. Malt and honey add flavour plus some simple sugars, so the serving still matters.
- Helpful or harmful
- The useful side is rye, fermentation, spices, and satiety. The risk is large slices plus sweet or fatty additions.
- Amount
- Often 1–2 thin slices, about 30–60 g, are enough. Taste one piece plain first.
- Best pairings
- Good with fish, eggs, cottage cheese, mild cheese, vegetables, herbs, borscht, or cabbage soup. Jam, honey, and sweet tea are occasional dessert pairings.
How to eat
- Post-bake rest is required: mature crumb slices better and feels better in the mouth.
- Use Borodinsky as a flavour accent on the plate rather than a large starch base.
Limits
- Contains gluten, honey, and noticeable acidity.
- For diabetes or blood glucose control, count the starch portion as well as the honey.
Instructions
-
Refresh starter
Run three refreshments: 1:2:2 → 1:3:3 → 1:4:4 (a reduced build for the small sponge: 10+20+20 → 8+24+24 → 10+40+40). Use 25 g active starter in the Sauerteig and save 15–20 g as the ongoing starter.
-
Make scald
Hold 112 g rye flour, 28 g red malt, 12 g white malt, 8 g coriander, 5 g caraway, and 325 g boiling water for 3 h at 65 °C. Cool 30–40 min and refrigerate.
-
Make Sauerteig
Hold 25 g active starter, 75 g rye flour, and 75 g water for 4 h at about 23 °C, then refrigerate about 19–20 h until the Friday-morning warm-up.
-
Mix
Warm the scald and Sauerteig. Mix all Sauerteig, all scald, 275 g rye flour, 75 g wheat flour, 10 g salt, 38 g sugar, 25 g molasses/honey, and 100 g water with Kenwood KVC85.004SI and K-beater on Min 1–2 min; scrape and add 30–60 sec on Min if needed.
-
Proof
In the Emile Henry pan: about 2–2.5 h at 30 °C without fan, then 60–75 min on the counter during oven preheat. Bake at 1.5–1.8x rise with fine surface cracks.
-
Bake
250 °C 10 min → 200 °C 25 min → 170 °C 30 min → 140 °C 20 min. For the control repeat, bake without steam; the 8 May result is still n=1. Target 98–99 °C internal.
-
Mature
Cool 2–3 h uncovered on a rack, then wrap in cotton/linen/towel. No plastic during the first day. Slice after 24 h.
Version history
- v3.8May 20, 2026
- Problem
- The working sheet did not show the full cooling, storage, and 24 h slicing window clearly enough.
- Change
- The final Cooling, storage, slice step is now a range from 8 May 13:35 to 9 May 13:35; prepTime and totalTime stay tied to the bake start and oven exit.
- Result
- The published recipe now separates process timing from evaluation timing: bread readiness is judged after the crumb has stabilized, but totalTime ends at oven exit.
- Conclusion
- Borodinsky conclusions should be recorded only after correct cooling, storage, and at least 24 h of maturation.
- v3.7May 8, 2026
- Problem
- After the 8 May bake, the knowledge-base checks needed to be reflected on the public page: no steam, hand mixing time, and storage after early slicing.
- Change
- The formula did not change. Added that steam is currently optional for the Emile Henry Borodinsky pan loaf after one no-defect bake at 99.2 °C internal; actual Danish-whisk mixing took about 4–5 min; early slicing and countertop storage are not a clean ideal-storage check.
- Result
- The next Borodinsky can be repeated as a dry bake without mixing the steam variable with sweetness, water, or spice changes.
- Conclusion
- If a second no-steam repeat is also clean, this can become a stronger personal oven/pan rule.
- v3.6May 8, 2026
- Problem
- The English page still carried the old simplified Borodinsky formula while the Russian page and working sheet had moved to the current Emile Henry v3.6 process.
- Change
- Synchronized ingredients, scald, Sauerteig, proofing, stepped bake, storage, images, and the expanded theory with the Russian current recipe.
- Result
- The English Borodinsky page now describes the same working formula as the Russian page.
- Conclusion
- Do not change sweetness or spices before the 24–48 h crumb and storage assessment.
- v3.5May 8, 2026
- Problem
- The 8 May bake showed the working sheet needed visible quantities on each step, markdown/CSV export, and a realistic cold-ceramic proof schedule.
- Change
- Added per-step quantities, the Emile Henry proof schedule, base 100 g final water, and a note that steam is optional for this pan loaf.
- Result
- The kitchen sheet can be followed without reconstructing ingredient amounts from the formula.
- Conclusion
- Keep sweetness and spices unchanged until the 24–48 h tasting.
- v3.4May 5, 2026
- Problem
- The worksheet used broad labels like morning and evening, making shifted starts hard to follow.
- Change
- Added concrete times and a calculator from the first refreshment start.
- Result
- The sheet can recalculate the full schedule when the actual start shifts.
- Conclusion
- Timing is a working plan; starter, scald, and proof state still decide readiness.
- v3.3May 5, 2026
- Problem
- The English Borodinsky page needed the expanded theory standard used by the current lessons.
- Change
- Added theory for the Borodinsky system, sourdough/scald roles, proofing risks, storage, and sources.
- Result
- This recipe now explains why this bread should be adjusted one variable at a time.
- Conclusion
- Diagnose storage, rested crumb, acidity, sweetness, malt, and spice before changing the formula.
- v3.2April 30, 2026
- Problem
- The modern-method review found that this advanced regional lesson needed explicit home controls and diagnostic questions.
- Change
- Added home adaptation for scald timing, starter readiness, pan proof, storage, crumb rest, and tasting language.
- Result
- Borodinsky now teaches how to manage a complex flavor system at home.
- Conclusion
- Do not change water or sweetness before checking storage, rested crumb, and sensory balance.
- v3.1April 24, 2026
- Problem
- After 3 hours of saccharification, the scald should not sit on the counter overnight without acidity control.
- Change
- After 65 °C × 3 hours, cool the scald to about 40 °C and refrigerate overnight.
- Result
- The recipe became safer for a home schedule.
- Conclusion
- If an overnight room-temperature scald is needed, it should be acidified or kept warm rather than left as a sweet neutral mass.
- v3.0April 22, 2026
- Problem
- The previous version was less controllable in schedule, proofing, and baking.
- Change
- Added cold storage for the sponge, 3–5 minute mixing, two-stage proofing, a 250→200→170→140 °C bake profile, and target dough mass for the Emile Henry pan.
- Result
- Borodinsky became a home worksheet rather than only a formula.
- Conclusion
- The next test should collect actual crumb and flavor data.
- v2.0March 15, 2026
- Problem
- The base version lacked the characteristic dark scalded rye flavour.
- Change
- Added scald with red rye malt
- Result
- The bread gained the colour and flavour profile expected from Borodinsky.
- Conclusion
- The scald became a required part of the formula.
- v1.0February 20, 2026
- Change
- Base recipe
- Conclusion
- Starting point for later changes.